windsurfing in N.Z. |
windsurfing in N.Z. |

[I have read this article a couple of times and drawn a number of diagrams which are my interpretation of the instructions and annotated accordingly, but please, if you decide to have a go at this read it carefully and make up your own mind. Bruce.]
This info is offered for your info only. This is dangerous, so don't sue my butt if you crash and nuke yourself...and all the appropriate other disclaimers.
Once you have the materials together, it is super quick to build. Draw this out for yourself, and maybe you have better, and simpler ideas, but this works well. This is very simple to sail, and is much easier than sailboarding, but for the advanced sailor is a blast too. Mega speed!!
I apologize to the ad hoc nature of this, any typos, and confusion in advance but this may not even get proof read. If you really want to build it an have questions I'll try to answer them.
History...The original designs started about 1983 or 84, and the final 1985 version hasn't changed too much, although everyone builds them slightly differently. The description of this plan is from Roland Rioux originator of this design of surfer, a local fanatic of any wind powered speed vehicle including hang gliding, sailboards, and ice surfing. A racer of a few years back, Rollie is doing all these things, still catching huge air and marvellous sailor at 47.
Description...The idea is to produce a stable vehicle at high speed, in varible ice, heaved ice, slush, drifted snow, snowcovered terrain. This is a "tricycle" type vehicle. The purpose of the "nose" ski is for stability, and offers very little resistance in even a tight turn. The rear "main" skiis are the only ones with blades attached. This will describe a varible depth blade, but this is not critical some people just bolt the blades on. They have to be sharpened, so having a removeable blade is kinda handy. The nose ski is removed for transporting the surfer. Typical sailboard gear is used for mast base, mast, sail, boom, harness, and lines. Even at 0 degrees Fahrenheit you'll be sweating!!
Materials...read it and figure it out. Imperial measures! Lumber quality of your choice, but good one side plywood, and a clear and true 2x4 would be fine. You'll need three downhill type skiis, the longer the better 207cm, 210cm whatever. 1/2 sheet 3/4" plywood (fir or something durable) ie. 4'x 4' sheet req'd. One 8' 2x4. Two lengths of approx. 1/8, or 3/32" x 2" wide x 36" long, and 2 pieces 2" wide x 2 1/2" long (maybe 4 if you want to make the front of the blades depth adjustable) of flat steel. If you don't care about money, go with stainless. (Your blades.!!) Steel is fine a bit of rust is not big deal anyway. Iron is out of the question for the blades, but would be good for the 2 1/2 " long pieces. About 4-6 ft or 1" radiator type hose ( for the footstaps. This works well, because it has the fibre in it, and gets stiff in the cold, but not brittle.), some 1 inch, #10, or #12 self tapping screws, a two bolts about 3/8" x 3" with nuts and washers, more wood screws, and other stuff you can figure out that I've missed.
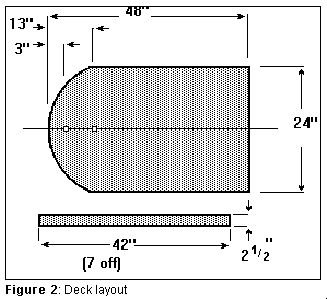 Deck...2 ft. x 4 ft. x 3/4"
plywood if you want, round the front in an arc back to about
43" on the sides (figure 2). Serves no purpose except
cosmetic. If you don't have the tools, get the lumber yard to rip
up your plywood for you, any cut out 7 strips, 2 1/2" wide
out of the rest of the plywood. Drill two holes for 3/8 bolts on
the center line, one at 3", and one at 13" from the
front of the board. This is where the "nose" ski
mounts.
Deck...2 ft. x 4 ft. x 3/4"
plywood if you want, round the front in an arc back to about
43" on the sides (figure 2). Serves no purpose except
cosmetic. If you don't have the tools, get the lumber yard to rip
up your plywood for you, any cut out 7 strips, 2 1/2" wide
out of the rest of the plywood. Drill two holes for 3/8 bolts on
the center line, one at 3", and one at 13" from the
front of the board. This is where the "nose" ski
mounts.
Skiis...Six of the strips need to be shortened to 42 inches, and make the front into a point, about 45 degree angles from centre. Clamp and cut three at a time together.
Are you feeling like you are trying to put together a kid's Christmas present with lousy instuctions?
 You are making an attachment to
mount to the ski, and laminate together to raise thedeck up 3 x
3/4 ". The idea is that 3 of these mount on the underside of
the deck, flush with the sides, and the back of the deck, and on
each side of the deck. The point is so that snow and ice don't
pack up on the ski so badly. Why not use a two by four, or two
2x4 's? This is supposed to be stronger, and high enough off the
ground/ snow/ ice.
You are making an attachment to
mount to the ski, and laminate together to raise thedeck up 3 x
3/4 ". The idea is that 3 of these mount on the underside of
the deck, flush with the sides, and the back of the deck, and on
each side of the deck. The point is so that snow and ice don't
pack up on the ski so badly. Why not use a two by four, or two
2x4 's? This is supposed to be stronger, and high enough off the
ground/ snow/ ice.
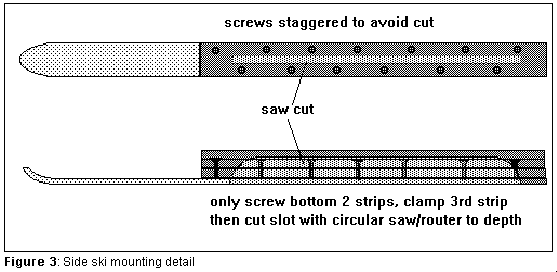
 The tail of the ski is going to
finish as being flush with the stern of the deck. Mount the
boards on the ski flush with the tail with counter sunk wood
screws AWAY FROM THE MIDDLE of the ski (figure 3). If you READ
THIS NEXT PART BEFORE YOU PUT THE SCREWS IN you'll understand
why.After you have two of the layers of plywood mounted to the
ski, then to each other with the screws, staggered at about
3" side to side intervals, clamp the third strip to the
other two. Cut a saw blade wide, 1 3/4 inch deep channel from the
middle of the bottom of the ski, long enough considering the arc
of the blade, to insert your blade, finish the cut before 2
3/4"- 3" from the tail of the ski. Remember the tail of
the ski, and the tail of the board are flush. If an inch of the
ski extends back, don't worry, but the idea is to have you rear
foot pressure over the turn pivot like in windsurfing. The front
of the blade is going to hang out about 1/4". DO NOT mount
this to the deck YET.
The tail of the ski is going to
finish as being flush with the stern of the deck. Mount the
boards on the ski flush with the tail with counter sunk wood
screws AWAY FROM THE MIDDLE of the ski (figure 3). If you READ
THIS NEXT PART BEFORE YOU PUT THE SCREWS IN you'll understand
why.After you have two of the layers of plywood mounted to the
ski, then to each other with the screws, staggered at about
3" side to side intervals, clamp the third strip to the
other two. Cut a saw blade wide, 1 3/4 inch deep channel from the
middle of the bottom of the ski, long enough considering the arc
of the blade, to insert your blade, finish the cut before 2
3/4"- 3" from the tail of the ski. Remember the tail of
the ski, and the tail of the board are flush. If an inch of the
ski extends back, don't worry, but the idea is to have you rear
foot pressure over the turn pivot like in windsurfing. The front
of the blade is going to hang out about 1/4". DO NOT mount
this to the deck YET.
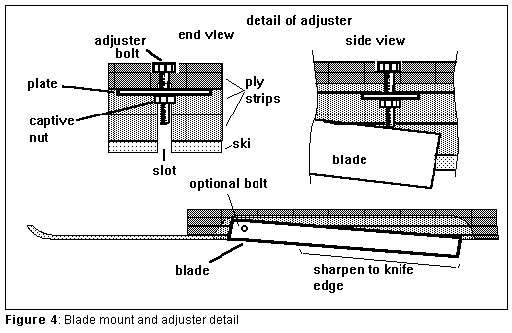
Blades...2" wide by 36"long flat steels, sharpened to a knife edge (45 degree or so...not critical) YOU ONLY NEED TO SHARPEN the last 18" or so. Round off all the corners, but PARTICULARLY the corner that is going to be the bottom front that is going to hang out about 1/4" all the time. The tail/shape end of the blade is generally for most people, hanging out of the ski about 3/4" all the time. Many of the surfers here have the blades loose, meaning that they are tight in the slot, but if you turn the board over, you can just pull the steels out. The front of the blade can be inserted (figure 4), and drilled through, and bolted if you want, with the 1/4"sticking out. You may choose to have depth adjustment front, and rear. Some just bolt the blades to the mounting strips, but there is alot of side loadingon the blade at high speed. Depth adjustment...You may have to experiment with bolt lengths here a bit! You want the rear to adjust from about 3/4" fully extended to 3/8" showing outof the ski at the fully retracted. Pick a point about 3/4" to 1" from the tail end of the blade when mounted on the board. You may have to do some clamping, or temporarymounting. Drill as small a guide hole as possible to line up with the top of the blade. Counter sink a hole for a 3/8" bolt head in the deck of the board. Take the clamping apart, and go to the first lamination. Cut and chisel a mortise (channel) laterally across the strip to countersink the 2 1/2" steel/iron pieces. Reclamp, and re-drill the guide hole to mark the steel. Drill a hole in the steel to accept a 3/8" bolt. Back to the first lamination, and countersink a hole to accept the nut, and HOLD IT TIGHT, under the mortised area for the steel. Drill a hole through the deck, into the mounting strip, to about 2 7/8" for the 3/8" bolt. Mount the bolt through the deck, with the flat steel and the nut. "Dry fit" everything to make sure it's going to go together. Take it apart, except with the bolt, the small steel plate, and nut togther, with a hammer, round over the end of the bolt, so that it is permanently a unit, ie you can't get the bolt out of the nut now!!! If you want to make the front depth adjustable do this in the front also. NOW screw all the parts together staggering the screws about 3" side to side.
 Nose Ski...Cut 24" of the
remaining strip. Mount it on the last ski, centered up on the ski
(figure 4). ie the center (12")mark on the board at the
center (of the tip to tail)of the ski. Also align the 2x4 with
the ski. Use screws staggered along the length at about 3"
intervals. Mount the front of the 8 foot 2x4 flush to the front
of the mounting strip. You can leave t his at 8', or shorten it
up to 7' 8", but longer is better for stability. Mark a
center line, and mount under he deck by drilling through the two
holes you drill at the front of the deck.
Nose Ski...Cut 24" of the
remaining strip. Mount it on the last ski, centered up on the ski
(figure 4). ie the center (12")mark on the board at the
center (of the tip to tail)of the ski. Also align the 2x4 with
the ski. Use screws staggered along the length at about 3"
intervals. Mount the front of the 8 foot 2x4 flush to the front
of the mounting strip. You can leave t his at 8', or shorten it
up to 7' 8", but longer is better for stability. Mark a
center line, and mount under he deck by drilling through the two
holes you drill at the front of the deck.
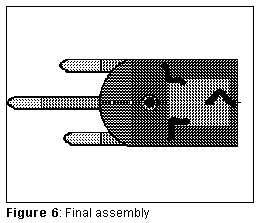 PUT IT TOGETHER...mount the
laminations on the ski, the deck on the mounting strips. Mount
the mast on center, at 32" from the rear of the board
(figure 6). Mount the footstraps/rad hose with the #10 or #12
1" round head screws. Cut the length long enoughfor you to
have your winter boots on, and be snug, generally about 6.5
inches, with about 3" at the top of the arc of the strap,
depending on the size of your feet with boots on. You might want
to fold the ends back on itself, or use washers so the screws
don't pull through. You will want you heels out past the edge of
the deck, the straight straps about 3" from the edge, the
angled about 1 1/2" from the edge on the closest point to
the edge. Angled at about 45 degrees. Straps a comfortable
stance, normally about 18" apart to the closest corners, the
straight strap mounted about 6" from the tail. If it's not
right, drill more holes in your deck!!
PUT IT TOGETHER...mount the
laminations on the ski, the deck on the mounting strips. Mount
the mast on center, at 32" from the rear of the board
(figure 6). Mount the footstraps/rad hose with the #10 or #12
1" round head screws. Cut the length long enoughfor you to
have your winter boots on, and be snug, generally about 6.5
inches, with about 3" at the top of the arc of the strap,
depending on the size of your feet with boots on. You might want
to fold the ends back on itself, or use washers so the screws
don't pull through. You will want you heels out past the edge of
the deck, the straight straps about 3" from the edge, the
angled about 1 1/2" from the edge on the closest point to
the edge. Angled at about 45 degrees. Straps a comfortable
stance, normally about 18" apart to the closest corners, the
straight strap mounted about 6" from the tail. If it's not
right, drill more holes in your deck!!
Paint it..go wild. Redek it or use varathane with sugar (not really necessary).
Please use common sense, an some good risk management.If you are going a long way, and then stopping, remember about sweating, and hypothermia in cold weather. Take a rope along 'cus it may turn into a sleigh on a light wind day. Beware in the spring.
Please email me at jwood@mbnet.mb.ca and tell me what mods work or don't and what you think.
| © 1996 wiNZurf |